Showing posts with label quilt. Show all posts

Wednesday, February 06, 2013

Ah, the Joy of Finished Projects

I love the winter. I wish it would last all year long just because it is the time when I can spend lots of time in my studio.

I finally finished the portrait of my ridgeback, Bree.

IMG_0503.jpg


IMG_0502.jpg


It was a very labor intensive process because all of the edges are turned under or seamed. I usually do a lot of raw edge work because you get results much faster, but it is worth it sometimes to take the extra time to turn those edges.

I also finished a couple more quilt tops for the beds at our inn, the Greenville Arms 1889 Inn. Here they are already to be sent to be long arm quilted.

IMG_0501.jpg


Next up on the schedule is a twin quilt top to match the queen quilt. (We have several rooms that have a queen bed and a twin bed in the room.) Also, to finish the whole cloth thread sketched paintings that I started in Susan Brubaker Knapps' workshop this past December.

Sunday, March 04, 2012

Blueberry Peel Top is Done!

Finally, I have finished work on the Blueberry Peel quilt top.

IMG_8786.jpg


The top is for a Queen size bed - 96" x 108". The paper-pieced block pattern is from Karen Stone's Indian Orange Peel pattern that I purchased way back in 1993 when I took a class from Karen. (Marvelous class, marvelous teacher!)

9418DD63-CAEA-4931-9E9B-6E1D1DF56815.jpg


This is an illustration of how much fun it is to play with colors! You can take a pattern like Karen's and create something that looks so different just by changing colors and layout.

Every once in a while I keep track of the time it takes to make a particular project and I did it with this quilt top.

This is how long it took to finish the various parts:


  • Cut out the paper templates for 296 arcs = 4.35 hours

  • Paper-piece the races = 51.8 hours

  • Trim the edges of the arcs = 3.5 hours

  • Remove paper from the arcs = 9.87 hours

  • Remaining cutting and assembly = 20.18 hours


For a total of 89.7 hours! Multiply that by your basic minimum wage and you'll begin to understand why a hand made quilt should never be sold for anything under $1000. This total doesn't even include material costs, quilting services, or binding. I also wasn't absolutely meticulous in starting my timer the minute I started work.

Granted a less complicated quilt top would probably be completed faster or one that didn't use so many different fabrics. I'll have to time the next quilt I made, just for comparison. (I've got an app for this on my iPhone, so it is more fun than watching a clock!)

For a number of the border layers I used the leftover trimmings from the arc backgrounds. This "scrap" was large enough to cut pieces that were around 1.5" x 2", which I sewed into mini 4-patches or into strips.

It is always fun, and sometimes quite a surprise, to see what my finished quilt looks like when I finally spread out the finished quilt top to take a picture because while I'm working and designing in my tiny studio, my quilt project is generally in a big lumping fabric bunch. The borders and such are designed roughly on paper because my design "wall" is only 4' x 6'.

Next on my project agenda is a 12" x 12" art quilt to donate to the Studio Art Quilt Associates auction that is held every year, usually in the Fall, but I don't have the exact dates yet. I just know the deadline for submission is this month!

Sunday, February 05, 2012

More Blueberry Peel Pieces

I'm still working on the Blueberry Peel quilt. The main portion of the top is finished.

This is a shot of a portion of it.

IMG_0399.jpg


I'm now piecing some more peels for a border treatment. The peels are in white and pale blue patterns and the background will be the darker blues and gray/black.

IMG_0400.jpg


Finished another knitting project - a bulky yarn shrug. Perfect for keeping warm at the sewing machine when you want your wrists and arms free but still have your shoulders and back warm.

IMG_0404.jpg

Tuesday, January 10, 2012

Studio Update - Jan. 10

Obviously all my creativity has been soaked up in my studio and I have none left for creative blog titles.

I'm still working on the paper-piece Indian Orange Peel. I've made it to the stage of piecing and preparing the centers for the blocks.

I'm using a tone-on-tone white fabric paired with a light blue. The four-patch is first pieced in 5" strips and then cut into 5" sections, that are then pieced to create the final 4-patch.

Next the freezer paper templates for the centers are ironed on the four-patch and excess trimmed away. I'm saving the trimmings for potential use in the borders.

IMG_0396.jpg


This is a example of what the finished block will look like, although these are not yet sewn together.

IMG_0393.jpg


On the knitting front, the sock block has been broken! All of last year I had this particular yarn on my needles that I just did not like. But the practical side of me just would not let me pitch it out, even though I had no motivation to work on the blinkin' socks. So that one pair of socks took me about a year to complete! Now that they are done, I'm a happy sock knitting fiend once again.

These are the latest off the needles and I already have another patterned pair almost finished.

IMG_0391.jpg


So let this tale be a lesson to you - sometimes you should just pitch the uninspiring project/materials!

Friday, December 02, 2011

Scrap Storm

I'm currently working on a paper-pieced bed quilt using Karen Stone's pattern Indian Orange Peel. I started this in a class sometime in the early 1990's and am finally getting around to doing something towards finishing it!

Nothing orange about it though - I'm doing it in blues, grays, and blacks (Blueberry Peel??)

IMG_0383.jpg


As I'm getting into it I'm reminded of the incredible fabric scrap storm created with this method!

IMG_0384.jpg


I actually love the look of this pile of scraps (which is why I let it pile up in the first place). There is an even bigger pile on the other side of my chair! It has always seem like such a waste to throw it away. So this time I've teamed up with another fiber artist who works with tiny scraps and I'm going to package them all up and send them to her.

I'm also keeping track of the time it takes to do each part of the process, which is fun to do now and then. This is not for the faint of heart or those thinking of going into business selling quilts like this. For example, I've already timed how long it takes to piece 4 of the arcs, which is what each block takes - about 40 minutes - and I'm going to need about 196 just for the main part of the design! I'll post the complete breakdown when I'm done.


Monday, February 28, 2011

Mosaics with Fabric Tiles

I've always loved mosaics, probably because they are sort like puzzles and you put them together with lots of tiny pieces. Don't know why I like working with tiny pieces, but I do!

Having finished my first goal of 2011 with the completion of the 5 traditional quilts for our inn guest rooms, I now have some time to get back to some art quilting!

As often happens when you are in that "in-between-projects" state, I'd walk into my studio with my mind spinning with hundreds of ideas, but not sure which one to start with, and would instead immediately consider some sort of procrastination project like cleaning or organizing my studio. Yikes!

So the best thing to do to avoid something as horrid as organizing my studio, is to jump right in with a small project that can be started right away and is quickly finished for that satisfying feeling of getting something done.

I decided to do a mosaic pear.

IMG_6295.jpg


The pieces are about half an inch and are backed with Misty Fuse. I have used Steam-a-Seam II for the mosaics I've previous made, but as I had none handy, I reached for what was handy - the Misty Fuse. It was quite nice to use. After selecting the fabric I was going to use, I cut small sections, about 6" x 6", of each and fused the MF to the backs. I could then cut a batch of fabric tiles from these pieces as needed.

All the tiles are stitched/quilted with varigated rayon thread from Mettler or Sulky.

While finishing it, I was thinking that I'd have to find another image to work with for my next piece, but already I can see different ways of working with the same image - playing with different colors, different angles, different backgrounds.

I created this piece specifically to fit the frame. I have a couple boxes of these frames leftover from when I sold my work at art and craft festivals in California.

Sunday, February 20, 2011

One More for Tradition

I've reached my goal of 5 new traditional quilts for our inn guest rooms! The final one is a Full sized quilt and it is a scrappy Ohio Star pattern.

IMG_6282.jpg


The quilts still need to be quilted but, since I'm not doing that part, I can now get on to other projects! I have a full month before the workshop season begins and I plan to take advantage of every available minute that I can get in my studio.

Thursday, February 17, 2011

The Beauty of Simplicity

Last year while browsing through some quilt magazine I saw an ad for a book about "modern" quilts. On the cover it featured a quilt with a simple design of stripes composed of gradient colors of blue interspersed with stripes of white. First of all, blue is my favorite color, so that is what caught my eye in the first place, but I was further entranced with the elegant simplicity of the design and the knock-out contrast that the white fabric provided for the blues.

So being the normal red-blooded quilter, I said "wow, I've got to make one of those."

I used EQ7 to create the block (a narrow 12" x 3" block made of of six 2" x 3" pieces of fabric) and then design the layout and size.

The blue blocks were all strip-pieced (2.5" x 40" strips sewn together and then cut into the blocks).

Here is the resulting Queen size quilt.

IMG_6287.jpg


This picture really doesn't it do it justice because of the lighting and the angle, but I'll get a better picture when it is totally quilted and finished.

But I loved the result so much, I immediately continued the process and made a matching Twin size quilt. (We have 5 guest rooms at the Greenville Arms 1889 Inn that have 2 beds - a Queen and a Twin, so this will be a good set for one of these rooms.)

Tuesday, February 15, 2011

Pinwheel King Quilt

It's been a while since I've blogged, but I've been busy doing blog-worthly work so that I'd have something to blog about!

I finished the top for the second King Quilt. It is a scrappy pinwheel pattern. Using white fabrics for contrast really made those bright fabrics "pop."

IMG_6289.jpg


This will go off to be quilted by Eileen Keane on Monday and she'll be bringing back the first King Quilt ready for binding and putting on a guest room bed at our inn, Greenville Arms 1889 Inn.

It has been a snowy winter with some impressive icicles forming on buildings all around town. Here is a shot of the ones outside my studio window.

IMG_0327.jpg


They were quite beautiful when the sun shone through them.

In between quilts, of course, I'm knitting. Here are my latest pair of socks. These are the first lace patterned socks that I've made. They are knit in Summer Sox by Classic Elite - 100% cotton.

IMG_0325.jpg

Saturday, January 15, 2011

More Strip Blocks for a Queen

I finished another quilt top towards my goal of 5 done this winter. I have just one more to go.

IMG_0313.jpg


Sigh, what I wouldn't give for a longarm machine. I currently send all bed quilts out to someone else to do, but would love to be able to do them myself. Not because these other longarmers don't do a great job, just because I'm a do-it-myself kind of person! Well, I can dream.

Today I'll start the final quilt top.

In between, quilting and WORK, I've been knitting, of course. We recently took a trip over to Webs, in Northampton, MA. THE best yarn store I know of. I gave my husband a certificate for a knitted sweater for his birthday, so we had to pick up some yarn for that and I also stocked up on sock yarn - my favorite thing to knit when my brain is too tired to think of anything else.

This is the yarn for the sweater.

IMG_0323.jpg


and a couple of the sock yarns.

IMG_0321.jpg


IMG_0320.jpg

IMG_0317.jpg


All of the yarn came from the extensive discount yarn room/warehouse at Webs. This is the best feature for the budget-minded knitter who still wants top quality yarns.

Tuesday, November 16, 2010

Aurifil Test Begins

Yesterday I started the comparison test with Aurifil. Just like for Curicini Tre Stelle, I wound 5 bobbins and cleaned and oiled the bobbin case.

IMG_0240.jpg

IMG_0241.jpg

Here is the pics after completing one bobbin full.

IMG_0242.jpg

The throat plate lint build up looks similar to the results for the Tre Stelle, but the bobbin case looks less linty.

IMG_0243.jpg

As expected, this thread handles like a dream. Smooth, quiet, and stitches that practically melt into the fabric.

I'm still only on the second bobbin, but completed the blocks for the scrappy pinwheel quilt top. I had to take the blocks out to the carriage house studio to use the floor space as my design area. First I set up the blocks on the tables in stacks of like colors - my design palette!

IMG_0245.jpg

Next I lay out the blocks, being careful to keep a pleasing mix of colors in all the rows.

IMG_0250.jpg

I had to stand on a ladder and hold the camera above my head to try to get as much of this quilt top in my photo frame as possible. And if you think that was a funny sight, imagine me picking up all of these blocks and keeping them in order as I stacked them from left to right!

IMG_0251.jpg

IMG_0253.jpg

Curicini Tre Stelle Prelim Results

I finally used up 5 bobbins of Curicini Tre Stelle 50 wt thread. I say "finally" because it seemed to last forever. This fine 2 ply thread allowed me load up the bobbins with more length than I could get with my previous brand of thread. Nice!

Here are pics of under the throat plate and in the bobbin case after the 5th bobbin was emptied.

IMG_0235.jpg

IMG_0236.jpg

So there is a bit of lint build up, but is this from the thread or the fabric? To early to tell (unless someone more familiar with lint patterns can enlighten me!) In addition to now testing Aurifil, I'll also do a similar 5 bobbin test with my previous much cheaper thread to see how that compares with these two fine Italians.

But I must say that even with a little lint build up, this thread was beautiful to use. It ran smoothly and quietly through my Bernina and lay down nice low profile stitches. Already, no matter who comes out on top, I'm sold on these quality threads.

I'm on to my second king-size scrappy quilt. This time I'm using 2 triangles to create a 4" square, and then arrange these into a pinwheel block. I'm loving how many squares I can assemble with this thread before emptying a bobbin.

IMG_0239.jpg

Monday, October 25, 2010

The Italian Face Off - Aurifil vs Curicini Tre Stelle

And so it begins . . .

I was so intrigued by my first experience with fine Italian threads that I've decided to do a head to head comparison between Aurifil and Curicini Tre Stelle.

I first learned of Aurifil at the Houston Quilt Festival back in 2005 and immediately fell in love with their 12 wt variegated thread. I like to use variegated thread for quilting and the 12 wt was a nice hefty thread that was still thin enough to run through my Bernina.

The Curicini Tre Stelle thread is new to me, but is a from a company that has been around for decades.

The first round of the Italian thread faceoff will be between 50 wt threads doing regular piecing. I use a Bernina 1260 and a 90/14 needle (because I don't like changing needles between cotton and metallic threads!)

In this corner is a grey 2-ply 50 wt Curicini Tre Stelle thread.

IMG_0223.jpg

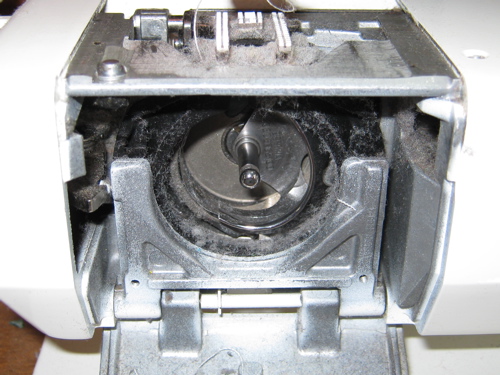
I've filled 5 bobbins and cleaned the bobbin case.

IMG_0224.jpg

Then in this corner, anxiously waiting his turn, is a white 2-ply 50 wt Aurifil thread.

IMG_0226.jpg

I am piecing regular commercial 100% cotton squares with a straight stitch and will go through 5 full bobbins. I'll be counting thread breaks and checking lint build up after each bobbin finishes.

IMG_0231.jpg

So far, I completed 1 bobbin full of the Curicini Tre Stelle. This is what the bobbin case looked like afterwards.

IMG_0229.jpg

IMG_0230.jpg

Sort of linty! Could be from the fabric, could be the thread, but won't know until the full test is finished. I'm thinking I may have to also run this test with the cheap brand of thread I was previously using just to get a data point on linty-ness.

Other than the lint, the Curicini is running smooth and beautiful through my machine and creating lovely stitches.

I have finished off one simple quilt top, but the challenge will continue on the next! Stay tuned for scintillating photos of lint build up or lack there of.

IMG_0233.jpg

(Sorry, no wet t-shirts or tight Italian pants in this faceoff. I'll have to leave those images to your imagination!)

Wednesday, October 13, 2010

Quilt Making Frenzy

Ever since the wedding quilt frenzy, I haven't been able to let go of the desire to make more standard quilts. It has been partly because I realized my scrap pile was threatening to take over my studio. I also needed more room for fabrics that I use in my current work, not the wild multi-patterned novelty-type fabrics I had purchased in the past. So the old stuff had to be used up, because, of course, I couldn't throw it away!

IMG_0218.jpg

I also realized that I have been at our inn, the Greenville Arms 1889 Inn, for 6 years already and have only completed a quilt for only one of the rooms. I feel like such a piker! Here I call myself a quilter and haven't even made quilts for the rooms -- although my art quilts are all over the place! But I wanted to put "my mark" on the inn as an innkeeper - something that might last longer than I. (Although I am not planning any departure from the inn anytime in the near future!)

IMG_0219.jpg

I also just like assembling pieces of fabric and it is a very relaxing thing to do when you are too exhausted to think of anything else.

IMG_0220.jpg

Another motivator is that I bartered one of our workshops at Hudson River Valley Art Workshops for some longarm quilting services. The workshop traded is coming up and I don't have any of the quilt tops ready! So I'm piecing at every chance I get.

IMG_0221.jpg

Nothing like a pile of chain pieced triangles. If I'm lucky I might have one quilt top ready by the time the workshop is over.

I was approached by a distributor to try out a line of Italian thread, Curicini Tre Stelle. It is a 2-ply long staple thread, reportedly just like Aurifil, another line of fine Italian thread. I tried the 50 wt cotton for piecing. The difference between this thread and the much cheaper brand that I had been using was marked! The Curicini ran through my Bernina like silk.

IMG_0222.jpg

Now I'm curious about the Aurifil 50wt. I have some but was waiting until I used up the cheaper stuff I had (waste not, want not!). But with the difference between the finer thread being so immediately noticeable, now I want to see how the two Italians face off!