Thursday, November 07, 2013

Market Report - 2013

Quilt Market in Houston was marvelous. We get to feel sort of isolated being innkeepers and hosts of the Hudson River Valley Art Workshops - Paint & Fiber (sometimes we don't leave the property for months at a time, except to get groceries), so having the opportunity to go Market this year was such a wonderful treat.

Browsing the vendors and picking up the vibe of the industry brought us renewed enthusiasm and inspiration for our business.

However, for me as a fiber artist, it was the exhibits that were the soul of the trip! Wow, such eye candy and artistic expression.

The added bonus of seeing the exhibits during Market instead of Festival was that there were no crowds and I could get fairly good shots of the quilts in the exhibits that allowed photographs, were were mainly the judged exhibits.

These are shots of my favorites. I didn't learn the results of the judging until after we were back home, but it was amazing the number of my favorites also turned out to be the favorites of the judges.

The title and artist's name is above the photo of the quilts.

Hand in Hand by Reiko Kato

IMG_0522.jpg


The next four photos are of the amazing Caryl Bryer Fallert exhibit - 30 quilts for 30 years. All thirty of these quilts were stunning - the artistry, composition, color, and stitching. We bought the CD of the exhibit so that I can be inspired whenever I want.

IMG_0525.jpg


IMG_0526.jpg


IMG_0527.jpg


IMG_0528.jpg


Wind by Masanobu Miyama

The Superior Threads Master Award for Thread Artistry winner

IMG_0529.jpg


I just loved the feeling of wind expressed with the blowing fur and swirling colors in the sky. Just beautiful and expressive.

House in the Valley #5 by Laura Wasilowski

Art-Miniature - 3rd place winner

IMG_0531.jpg


My favorite part of Laura's work is her sense of whimsey! Love it. I was sorry to see that this piece was already sold. Laura is teaching a workshop for us next year in April.

Tropical Fantasy by Bonnie Ouellette

IMG_0533.jpg


What can I say, I love beads and bright colors. Some of the leaves are completely covered in beads and others are hand silk-screened fabric.

Home at Last by Kaye Koler

Miniature Quilts - 3rd place winner

IMG_0535.jpg


The log cabin block is one of my favorite traditional patterns and this one is so wonderfully scrappy. The fact that it is no larger than about 14" square makes it all the more amazing.

Pray for the Land of Green by Masa Yanagimoto

Mixed Technique - 2nd place winner

IMG_0537.jpg


This piece was in the embellished category and it is a beautiful example of just the right amount and kind of embellishment. It features Japanese embroidery, Sukashi with kumiage (combination open work), hand piecing and appliqué.

Illinois Album by Jane Sassaman

The Baby Lock Master Award for Innovative Artistry - winner

IMG_0539.jpg


I'm always inspired by Jane's work! The photo below is a detail shot of the same quilt. Jane is teaching another workshop for us next year in December.

IMG_0541.jpg


In the Bleak Midwinter by Ruth Powers

IMG_0542.jpg


Beautiful use of hand-dyed fabric to evoke the chill of winter. Ruth will be teaching a workshop for us in 2015.

Random Rose Garden by Karen Eckmeier

Innovative Pieced - 2nd place winner

IMG_0544.jpg


Such a marvelous blending of colors.

A Pocket Full of Paisleys by Lorilynn King (detail shot)

IMG_0546.jpg


I Have Many Faces by Natalie Carlton

Art-People, Portraits, and Figures - Honorable Mention

IMG_0548.jpg


Jack by Sandy Curran

IMG_0550.jpg


All Together by Hiroko Miyama and Masanobu Miyama

IMG_0552.jpg


Emmy Tovo by Sherri Culver

Art-People, Portraits, and Figures - 3rd place winner

IMG_0554.jpg


I love the playful expression in this portrait and the use of the fabrics.

Cock of the Walk by David Taylor

Art-Pictorial - 3rd place winner

IMG_0556.jpg


David is teaching a workshop for us next year in August, which is filling fast.

Did You Wash Your Beak? by David Taylor

Judge’s Choice winner

IMG_0558.jpg


Venus in the Garden by Sheila Frampton-Cooper

IMG_0560.jpg


This photo doesn't do this large piece justice. It is amazing. I love the composition, the colors, and intense stitching. Sheila will be teaching a workshop for us in 2015.

Shadows 2 by Margarete Steinhauer

IMG_0562.jpg


This is just a general shot of a grouping of fabulous works. I'm sorry I didn't get the titles and names of the artists but my camera battery gave up the ghost right after this shot.

IMG_0564.jpg


It Takes the Case by Karlyn Bue Lohrenz

Art-Pictorial - Honorable Mention

IMG_0565.jpg


The Great Barrier Reef by Miki Murakami

IMG_0567.jpg


Emerald City by Norma Schlager

IMG_0569.jpg


Tutti Frutti Main Street by Susan Bleiweiss

Art-Whimsical - Honorable Mention

IMG_0571.jpg


Lair of the Amethyst Deva by Sheila Frampton-Cooper

IMG_0573.jpg


Snow Buddies by Ruth Powers

IMG_0577.jpg


Best Friend by Barbara Yates Beasley

IMG_0579.jpg


I was immediately drawn to this happy dog face, probably because, as I learned after reading the description, the dog is part Dalmatian, so I recognized the smile!

Sue Spargo's booth at Market displaying all her original folk art quilts.

IMG_0581.jpg


Sue will be teaching a workshop for us in 2015.

Jane Sassaman posing the booth featuring her new line of fabric.

IMG_0582.jpg


Lenore Crawford's work on display in the Northcott fabric booth.

IMG_0584.jpg


Lenore is teaching a workshop for us next year in November.

One can dream can't one . . . . The new Bernina.

IMG_0585.jpg


I love the art of Charlie Harper and this new line of fabric by Birch Fabrics features his art. It is made of organic cotton.

IMG_0586.jpg


On the last day of our stay in Houston, we took the Texas Quilt Museum tour. The museum is in La Grange, TX, which is about 2 hours west of Houston. The bus was very comfortable and the tour guide kept us all entertained with lively descriptions and histories of the things and towns we passed on the way.

There are no photos allowed inside the museum, but this wonderful mural is painted on the outside.

IMG_0587.jpg


IMG_0588.jpg


Also next to and part of the museum was this lovely historically inspired garden.

IMG_0589.jpg


IMG_0590.jpg


IMG_0591.jpg


IMG_0592.jpg


The museum is near the town square in La Grange. The center of the square is the location of the historic town court house, an impressive stone structure with an atrium in the center.

IMG_0593.jpg


Not showed but one of the highlights of this stop was the Quilted Skein, my dream quilt shop that not only had loads of tempting fabric, but also yarn! It was right next door to the museum.

Then next stop on the tour was the town of Round Top, TX (we have a Round Top, NY near us!) The feature of this little town was the Henkle Square Market - grouping a small shops, one of which was the Copper Shade Tree, a shop featuring artisan-made products including fiber arts.

Another of my favorite shops was the pie shop, Royers Pie Haven! I enjoyed a slice of yummy strawberry rhubarb pie on the front porch. Nothing says "country living" more than homemade pie on the front porch!

IMG_0594.jpg


IMG_0595.jpg


All in all, it was an awesome experience and I look forward to doing it all again some day.

Sunday, September 08, 2013

Foundation Rabbit

The first rabbit is complete! I'm planning to make a bunch of rabbits and then later use them in one or more compositions.

IMG_0519.jpg


This one has some interesting variations in color, which I can decide to blend with stitching thread color or add shading with ink. It all depends on the setting and background.

It will be handy to have this one pinned to my design wall as I work on the next one.

Thursday, September 05, 2013

Art Quilt Exhibit at the Greenville, NY Library

An exhibit of 20 of my art quilts is on display in the downstairs gallery space of the Greenville Library during the month of September. The library is open Monday thru Friday, 9am to 5pm.

IMG_1296.jpg


IMG_1293.jpg


IMG_1295.jpg


IMG_1294.jpg


Wednesday, August 21, 2013

Sparse Results

It's been a very busy summer with Hudson River Valley Art Workshops, and so I've had little time to work in my studio on art projects. However, I did finish one little landscape piece.

IMG_0513.jpg


I had started this with the intention of donating it to the Studio Art Quilt Association auction for this September, but what with one thing or another, I didn't get it started in time to finish it by the deadline. So since I missed the deadline, I didn't have to stay within the 12" x 12" restriction! It is still small but I think the final measurement is somewhere around 12" x 14"

I've also been relaxing with a little needlepoint and recently finished this piece.

IMG_0512.jpg


It was a painted canvas designed by Brenda Stofft, which I purchased from the NeedleNook of La Jolla in California.

Next needlepoint I do will be of my own design. One of the nice things about doing needlepoint is that you have plenty of time to let your mind wander to think of other creative designs and ideas while your hands are busy with the one you are currently working on.

I've now started work on another large quilted rabbit piece. I don't have a final design in mind at the moment and will just be making a bunch of rabbits in various positions, sizes and colors. Later I'll decide on a composition.

Monday, April 08, 2013

Finishing Spree

On my last studio day I went on a finishing spree. I finished three projects that had been hanging around on my design wall all winter. It feels great to finally get them finished.

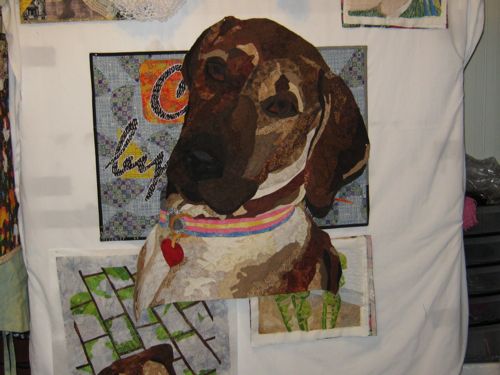
The first one is one that I created from a photo of my Rhodesian Ridgeback, Bree.

Wistful_full.jpg


I love this image not only for Bree's sweet look, but for the lines of the paving stones and the way that they lined up with Bree's head.

Next up are the whole cloth painted pieces that are also thread sketched that I began in the workshop with Susan Brubaker Knapp.

Fiddleheads_full.jpg


Dreadlocks_full.jpg


I finished the pieces with facing and then mounted them in frames.

All of these pieces will soon be up and available on my etsy shop.

Now comes the tough question . . . What will I start next?!

Monday, April 01, 2013

Etsy Shop is Back

Finally after a long hibernation, my etsy shop is back in business. The motivator was when I received an email from someone interested to know where they could buy one of my CrazyTies. So I told him I'd have them available on my etsy shop by the end of April. Nothing like a deadline to get you moving!

G2A_2011_full.jpg


Besides the ties, I'm planning to sell my smaller art quilts and hand-knit items.

Meanwhile back in the studio I'm working on completing some of my other projects, such as this one. I'm doing the thread-sketching and quilting. I've just done minimal about of stitching on the dogs face and body because I want that to stand out from the background. The background is being heavily quilted to make it lay flat, flat, flat.

I may add some hand stitching on the "grass" areas.

IMG_0506.jpg

Thursday, February 14, 2013

Blog Lovin'

I just started using BlogLovin' to follow the blogs that I like, based a recommendation from my daughter.

So now you can follow my blog with Bloglovin

Wednesday, February 06, 2013

Ah, the Joy of Finished Projects

I love the winter. I wish it would last all year long just because it is the time when I can spend lots of time in my studio.

I finally finished the portrait of my ridgeback, Bree.

IMG_0503.jpg


IMG_0502.jpg


It was a very labor intensive process because all of the edges are turned under or seamed. I usually do a lot of raw edge work because you get results much faster, but it is worth it sometimes to take the extra time to turn those edges.

I also finished a couple more quilt tops for the beds at our inn, the Greenville Arms 1889 Inn. Here they are already to be sent to be long arm quilted.

IMG_0501.jpg


Next up on the schedule is a twin quilt top to match the queen quilt. (We have several rooms that have a queen bed and a twin bed in the room.) Also, to finish the whole cloth thread sketched paintings that I started in Susan Brubaker Knapps' workshop this past December.

Saturday, January 12, 2013

Background to the Front of the List

Bree's face is finished, finally!

IMG_0472.jpg


Now to create the background.

In the original photo, she is sitting on the sofa and the wall in back of that is covered in a blue floral wallpaper. However, I didn't want to get too detailed with background because it might distract from the detail of the portrait. So, the "sofa" is created from random strip piecing.

IMG_0471.jpg


Then the wall behind is represented by a simple 3" square checkerboard of light blue fabrics. The two parts of the background are pieced together and then Bree was stitched in the center.

Now it is ready for quilting.

IMG_0475.jpg


Here is a detail of the quilting on her nose.

IMG_0476.jpg


I used a wide range of thread for the quilting, pulling out every brown variegated thread in my supply that I could find - Aurifil, Mettler, Superior, Valdani, Sulky.

I aways think that I have a good selection of threads until it comes time to actually work on a project with a lot of different values in one particular color. Then I'm thinking "why didn't I buy more thread?!"

I'm finished with the quilting and am planning to do the edge facing, hanging sleeve and label today.

Saturday, December 15, 2012

Art Holiday with Susan Brubaker Knapp

In a rare treat, I got to participant in one of our workshops at Hudson River Valley Art Workshops with Susan Brubaker Knapp. I was in heaven! It's been quite a while since I was able to take a workshop and this was just the right one to boost my creative spirit!

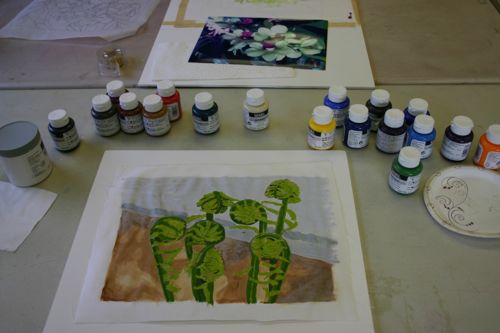
One of the things that was on my list of winter projects was to explore painting. I've been so inspired/tempted by the work I've seen the students do at the painting workshops that we host, that I just had to give it a try. This was the perfect way to ease into it.
We started from a photo that we traced on to white pfd fabric using a light box. Next the painting began. We used soft-body acrylics. I used Liquidtex brand.

As this was my first time working with painting on fabric, so I choose a simple composition of emerging ferns.

IMG_0789.jpg


IMG_0793.jpg


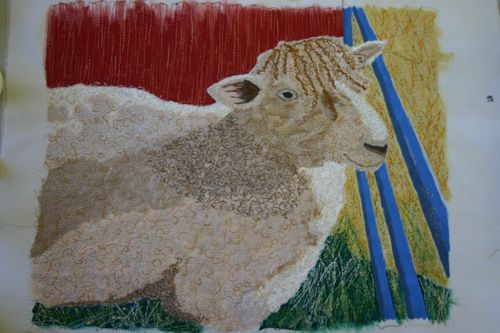
However, everyone else in the workshop selected much more complex designs, so I had time to work on a second piece - this one featuring a sheep that I photographed at the Rhinebeck Sheep and Wool Festival a couple of years ago.

IMG_0790.jpg


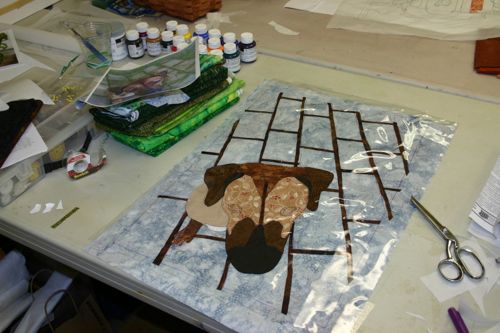
The next project was creating a fused piece, also starting from a photo. This time I selected a photo of my Ridgeback, Bree.

A vinyl overlay is used to help precisely position the pieces on the background fabric.

IMG_0797.jpg


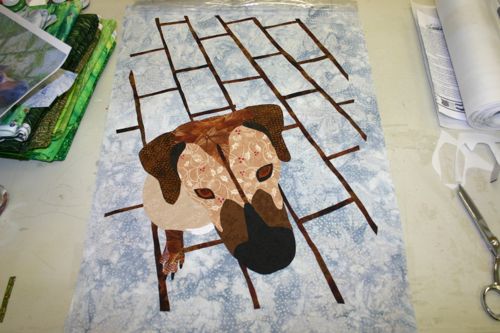
Once I got the main parts down, I could work without the overlay, for the most part.

IMG_0799.jpg


Starting to add the moss around the bricks.

IMG_0829.jpg


After completing the Bree composition, I returned to the smaller painted pieces to start thread sketching. I wanted to start small with the thread work before tackling the larger piece.

Here is the sheep ready for sketching.

IMG_0830.jpg


The finished ferns! Just needs trimming and facing on the edges.

IMG_0831.jpg


The finished sheep! You can't see it in this photo, but I added a double layer of batting under the body of the sheep to make him poof up.

IMG_0834.jpg


Susan Brubaker Knapp was an excellent instructor. She was knowledgable, organized, patient, and fun! I would highly recommend her.

Sunday, December 02, 2012

Let's Face It

Finally finished cutting out all the pieces, turning all the edges, and placing the pieces in the puzzle that is the portrait of my Ridgeback, Bree.

Here you see the progression of the sections as they come together.

IMG_0467.jpg


IMG_0468.jpg


IMG_0469.jpg


The next step in the process is to zig zag stitch the pieces together on top of the stabilizer with invisible thread.

After that, I may either turn my attention to coming up with a background or might play around with some ideas for "blending" some of the fabrics with some thread painting, inks, or ??.

Saturday, November 03, 2012

Getting Nosey

A bit more progress on the Bree portrait.

IMG_0466.jpg


I'm thinking that I may have to adjust a few pieces to make them blend better with each other, but I'll do that after I have everything in place. Who knows, when it is all together I may decide a couple "funky" pieces are just the right amount of character needed. After all, it is the unexpected pattern and colors that I like about working with commercial fabrics.

Sunday, October 14, 2012

Up to The Neck in Fabric

Finally completed the neck section of the portrait of Bree. That collar and surrounding area had a "million" tiny pieces!

IMG_0463.jpg


It's exciting when a piece starts looking like something.

This week was also a good week for sales. One of our inn guests bought the king size quilt right of the bed in his room! It was a scrappy pinwheel quilt that I just finished in February of last year. It's always thrilling to make a sale, but drats, now I have to quickly make another king size quilt for that room! My goal is to make a quilt for every one of the beds (21 in total) in our inn, Greenville Arms 1889 Inn, and now I'm back to only 5 done. LOL.

Monday, September 17, 2012

A Bit of Bree

Got in a good couple of hours in the studio last Saturday and made some more progress on the portrait of our Rhodesian Ridgeback, Bree.

IMG_0461.jpg


This completes the portion that is below her collar. The collar area is next Saturday's project -- hopefully!

The process is very time consuming, but it is enjoyable watching all the puzzle pieces come together.

Finished two sock projects last week. I have sock projects strategically placed around the inn so that I have something to work on when I'm waiting for guests to arrive or in the evening when I'm relaxing with the dogs.

IMG_0460.jpg

Monday, September 03, 2012

Bit By Bit Progress

When we are deep in our workshop season at the Hudson River Valley Art Workshop, my personal studio time becomes extremely limited. My work day begins at around 5:30am and ends at around 8:30pm. By then I'm exhausted and just want to hang out with my two pups and knit.

But as one of those pups is the inspiration for my current studio project, I do still try to escape to my studio every now and then, even if it is for just a couple of hours.

So here is an update on the bit by bit progress on the portrait of Bree, our Rhodesian Ridgeback.

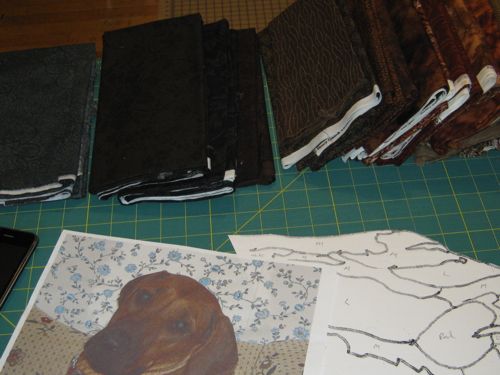
I start by pulling all potential fabrics for the project from the shelves and lining them up by value on my worktable.

IMG_0456.jpg


I keep checking the reference photo to verify color and tone with the fabrics I've selected.

IMG_0457.jpg


The next step is to take a deep breath and just start in on it! I trace a section of the pattern from the poster board onto freezer paper. This will be my pattern for cutting out the fabric pieces.

Then I select the fabrics I'll use for this small section. I usually then number the freezer paper pieces (before cutting them out) and arrange the fabrics on my table in order that I'll use them. This makes it easier to pick up from wherever I left off and also to remember which fabric I planned to use where when it may be a week to a month before I get a chance to work on the project again.

Now comes the cutting, edge turning, and putting the puzzle together part! The freezer paper template is ironed on the fabric and then cut out leaving a 1/8 to 1/4 inch allowance to be turned under. Then the corresponding poster board piece is cut out and used for turning under the edges.

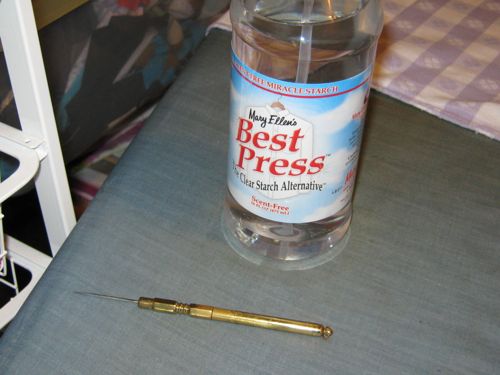
I use Mary Ellen's Best Press - the clear starch alternative. I love it. I use to use regular spray starch but Mary Ellen's is so much better and cleaner to use, plus you don't have to worry about attracting bugs to your quilt later on, especially if you don't plan to wash it, which I don't for my art quilts.

The pointed tool is a stiletto used to hold the edges as you iron. A very handy tool that I bought from Katie Pasquini Masopust when I took a class from her in the 1990's and learned the basis for this construction method. I think she still sells them!

IMG_0458.jpg


The poster board template is removed from the piece and then turned-under-edge pieces are arranged on the piece of Sulky Tear-Away stabilizer that also has the full pattern traced on it. The pieces are held in place just with the touch of the iron at a few places, not fully ironed down. This way you still have the chance to change pieces if they are just not working out in the over all design. I'll wait to I have the full figure complete before re-evaluating the fabrics.

IMG_0459.jpg