Sunday, December 19, 2010

Studio Report

The rabbit and squirrel are pinned to my design wall and patiently waiting for their moment to arrive. (Looks like they are watching that field for Spring growth!)

IMG_0300.jpg

My studio it too small to have too many projects active at one time, so they will have to wait until Christmas crafting is finished and then I have to resume work on the 5 bed quilts that are my top priority to finish this winter (3 down, 2 to go).

So a quick look around my studio shows the Christmas minis that I'm working on. I'm sending these instead of paper cards.

IMG_0299.jpg

I debated whether or not to send these as postcards through the mail, but then decided that I'd attach a cord to the tops to turn them into Christmas decorations/ornaments. I figured that by attaching a way to hang them to start with, it wouldn't be left to the recipient to figure out what to do with it or how to hand it up. To attach the metallic cord I inserted tiny grommets in each upper corner and threaded the cord through them.

What's fun about creating these little minis is trying out different threads. For the most part I work with Superior's Bottom Line in the bobbin. On the top I also used their metallic thread, their Highlights thread (loved the punch of that neon color), and their glitter thread (always a favorite way to add the hint of sparkle).

IMG_0310.jpg

My other favorite for the satin stitch around the edges, besides Superior's Highlight, was Mettler's rayon thread - for its smooth, shiny finish. However, I also tried Curicini Tre Stelle's 12 wt cotton thread (see mini below) and was mightily impressed with the wonderful dense, smooth coverage it produced. Very nice and no problems with tension adjustment. (I use a lot of metallics and heavy weight threads when quilting, so I always automatically reduce the upper tension on my Bernina to around 1 or 2 and use a 90/14 needle.)

IMG_0304.jpg

Unfortunately, I didn't have any 12 wt Aurifil on hand in colors that would work for the minis, so can't compare it for the satin stitch, but I have always liked it when I want a highly visible quilting stitch and so used it on several of the minis for that purpose.

The rest of my studio is still a mess with all of the hat boxes and hats that I haven't had time to deal with and with various parts of the bed quilts in process, not to mention the pile of yarn balls that were the result of my undoing a knitted coat I had made. (The two you see are just some of the 10+ that are piled on the floor.)

IMG_0301.jpg

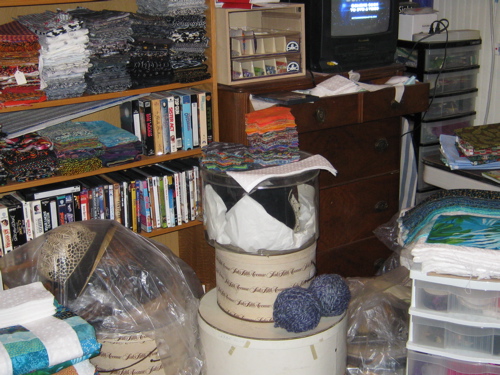
So that you have it, the current state of my studio.

Wednesday, December 15, 2010

More Animals Assembled

Ok, so that's not a scintillating post title. All of my creativity must drained into the squirrels.

The next animal I create during the Hudson River Valley Art Workshops retreat is a squirrel. Technically a Gray Squirrel, but all of the Gray Squirrels around here are two-tone. It's fun watching them outside of my office window. Occasionally I'll see one outside the window of my third floor studio. They are always shocked to see a human that far above the ground! LOL.

IMG_0285.jpg

IMG_0286.jpg

It is a fun process to create animal figures. The tricky part is getting the right expression and maintaining the animal-ness while using commercial prints. I like the commercial prints for the little "surprizes" you see - like the flowers on the belly of the squirrel.

The next step will be to come up with a scene to put these critters in.

Thursday, December 09, 2010

Fused Animal Figures

I'm getting a little break from my regular duties as innkeeper and art workshop director, to join in the fun in the studio during our December retreat. I am giving some informal lessons on how I create the rabbits for my rabbit series. I use two different techniques and was going to show both, but everyone is having such fun with the fused method (which is faster. LOL) that we have gone from rabbits to squirrels!

These are two of the finished rabbits. The one on the right is mine and the one on the left is by Leonie Lister of Australia.

IMG_0275.jpg

I'm supplying the fabric, so Leonie and I are working on tables opposite of each other and selecting from the same stash, but you can see what a difference it makes with how the values are used and where they are placed on the figure.

These rabbits will eventually be put in a composition with other similarly made elements, but because Leonie, just loves squirrels, we all decided to jump to that.

This is the start of my squirrel - the freezer paper templates.

IMG_0278.jpg

If I had made the squirrel the same scale as the rabbit, I could have put them in the same composition, but I decided to go for the mondo-sized squirrel. Watch out for your nuts!

Wednesday, December 01, 2010

Is Lint Really the Issue

I finished using all five bobbins worth of Aurifil 50 wt thread and took the standard shots of the bobbin case and throat plate area.

IMG_0255.jpg

IMG_0256.jpg

Yeah, there was lint. Pretty much similar to the lint build up seen with the Curicini Tre Stelle thread. So I have decided that I better do another test with less expensive brand of thread I had been using, to see if there was really going to be that much difference.

So here is a pic after one bobbin of use.

IMG_0258.jpg

Hmmm. Not a whole lot of difference between this and the Italian threads.

But then I was thinking . . . is lint really that big of deal or is it just the red herring of thread attributes? I mean so what if there is some lint -- after all what do you expect with cotton? Is the presence of lint going to make that much difference in the quality of the stitch or use of the machine? Yes, you do have to clean the lint out of the machine for the best continued performance, but that's just a part of maintenance.

So let's forget about the lint! Let's focus instead on the more important qualities of the thread - the appearance of the stitch, the way it is handled by the machine, and range of colors!

I thought that the Italians were pretty close in this comparison. The stitches were beautiful and the thread ran smoothly through the machine. I'll give the slight nod to Aurifil, though, on the stitch appearance -- the thread really did seem to just melt and become one with the fabric.

However, the difference between the Italians and the cheaper thread was quite marked. I could feel the ridge of the cheaper thread stitches on the surface of the fabric and the louder noise of the machine running with the cheaper thread was definitely noticeable. With the Italians, the machine just purred.

The end result -- I'm giving up using the cheaper thread! Yes, I am definitely on a limited budget but since I'm not using up billions of yards of thread per year, I feel that a thread that can make my sewing machine purr is worth it!

Both of the Italian thread companies offer an array of thread weights and materials, which I'll be comparing as I come to a project that can use them. I'm especially interested in trying the heavy weight cotton threads, as well as the wool and silk threads because those are the threads that a meant to be seen on the surface of the work.

So here's a toast to the Italians! They are as smooth and sweet as a Sauterne!

IMG_5602.jpg

I'm still working on piecing quilt tops, so if I notice any other aspect of note about these threads, I'll be sure to mention it.

The next top is a Queen size and it will use a simple 3.5" x 12" block design that will appear as stripes of blues alternating with white. These are my blues.

IMG_0260.jpg

Tuesday, November 16, 2010

Aurifil Test Begins

Yesterday I started the comparison test with Aurifil. Just like for Curicini Tre Stelle, I wound 5 bobbins and cleaned and oiled the bobbin case.

IMG_0240.jpg

IMG_0241.jpg

Here is the pics after completing one bobbin full.

IMG_0242.jpg

The throat plate lint build up looks similar to the results for the Tre Stelle, but the bobbin case looks less linty.

IMG_0243.jpg

As expected, this thread handles like a dream. Smooth, quiet, and stitches that practically melt into the fabric.

I'm still only on the second bobbin, but completed the blocks for the scrappy pinwheel quilt top. I had to take the blocks out to the carriage house studio to use the floor space as my design area. First I set up the blocks on the tables in stacks of like colors - my design palette!

IMG_0245.jpg

Next I lay out the blocks, being careful to keep a pleasing mix of colors in all the rows.

IMG_0250.jpg

I had to stand on a ladder and hold the camera above my head to try to get as much of this quilt top in my photo frame as possible. And if you think that was a funny sight, imagine me picking up all of these blocks and keeping them in order as I stacked them from left to right!

IMG_0251.jpg

IMG_0253.jpg

Curicini Tre Stelle Prelim Results

I finally used up 5 bobbins of Curicini Tre Stelle 50 wt thread. I say "finally" because it seemed to last forever. This fine 2 ply thread allowed me load up the bobbins with more length than I could get with my previous brand of thread. Nice!

Here are pics of under the throat plate and in the bobbin case after the 5th bobbin was emptied.

IMG_0235.jpg

IMG_0236.jpg

So there is a bit of lint build up, but is this from the thread or the fabric? To early to tell (unless someone more familiar with lint patterns can enlighten me!) In addition to now testing Aurifil, I'll also do a similar 5 bobbin test with my previous much cheaper thread to see how that compares with these two fine Italians.

But I must say that even with a little lint build up, this thread was beautiful to use. It ran smoothly and quietly through my Bernina and lay down nice low profile stitches. Already, no matter who comes out on top, I'm sold on these quality threads.

I'm on to my second king-size scrappy quilt. This time I'm using 2 triangles to create a 4" square, and then arrange these into a pinwheel block. I'm loving how many squares I can assemble with this thread before emptying a bobbin.

IMG_0239.jpg

Monday, October 25, 2010

The Italian Face Off - Aurifil vs Curicini Tre Stelle

And so it begins . . .

I was so intrigued by my first experience with fine Italian threads that I've decided to do a head to head comparison between Aurifil and Curicini Tre Stelle.

I first learned of Aurifil at the Houston Quilt Festival back in 2005 and immediately fell in love with their 12 wt variegated thread. I like to use variegated thread for quilting and the 12 wt was a nice hefty thread that was still thin enough to run through my Bernina.

The Curicini Tre Stelle thread is new to me, but is a from a company that has been around for decades.

The first round of the Italian thread faceoff will be between 50 wt threads doing regular piecing. I use a Bernina 1260 and a 90/14 needle (because I don't like changing needles between cotton and metallic threads!)

In this corner is a grey 2-ply 50 wt Curicini Tre Stelle thread.

IMG_0223.jpg

I've filled 5 bobbins and cleaned the bobbin case.

IMG_0224.jpg

Then in this corner, anxiously waiting his turn, is a white 2-ply 50 wt Aurifil thread.

IMG_0226.jpg

I am piecing regular commercial 100% cotton squares with a straight stitch and will go through 5 full bobbins. I'll be counting thread breaks and checking lint build up after each bobbin finishes.

IMG_0231.jpg

So far, I completed 1 bobbin full of the Curicini Tre Stelle. This is what the bobbin case looked like afterwards.

IMG_0229.jpg

IMG_0230.jpg

Sort of linty! Could be from the fabric, could be the thread, but won't know until the full test is finished. I'm thinking I may have to also run this test with the cheap brand of thread I was previously using just to get a data point on linty-ness.

Other than the lint, the Curicini is running smooth and beautiful through my machine and creating lovely stitches.

I have finished off one simple quilt top, but the challenge will continue on the next! Stay tuned for scintillating photos of lint build up or lack there of.

IMG_0233.jpg

(Sorry, no wet t-shirts or tight Italian pants in this faceoff. I'll have to leave those images to your imagination!)

Wednesday, October 13, 2010

Quilt Making Frenzy

Ever since the wedding quilt frenzy, I haven't been able to let go of the desire to make more standard quilts. It has been partly because I realized my scrap pile was threatening to take over my studio. I also needed more room for fabrics that I use in my current work, not the wild multi-patterned novelty-type fabrics I had purchased in the past. So the old stuff had to be used up, because, of course, I couldn't throw it away!

IMG_0218.jpg

I also realized that I have been at our inn, the Greenville Arms 1889 Inn, for 6 years already and have only completed a quilt for only one of the rooms. I feel like such a piker! Here I call myself a quilter and haven't even made quilts for the rooms -- although my art quilts are all over the place! But I wanted to put "my mark" on the inn as an innkeeper - something that might last longer than I. (Although I am not planning any departure from the inn anytime in the near future!)

IMG_0219.jpg

I also just like assembling pieces of fabric and it is a very relaxing thing to do when you are too exhausted to think of anything else.

IMG_0220.jpg

Another motivator is that I bartered one of our workshops at Hudson River Valley Art Workshops for some longarm quilting services. The workshop traded is coming up and I don't have any of the quilt tops ready! So I'm piecing at every chance I get.

IMG_0221.jpg

Nothing like a pile of chain pieced triangles. If I'm lucky I might have one quilt top ready by the time the workshop is over.

I was approached by a distributor to try out a line of Italian thread, Curicini Tre Stelle. It is a 2-ply long staple thread, reportedly just like Aurifil, another line of fine Italian thread. I tried the 50 wt cotton for piecing. The difference between this thread and the much cheaper brand that I had been using was marked! The Curicini ran through my Bernina like silk.

IMG_0222.jpg

Now I'm curious about the Aurifil 50wt. I have some but was waiting until I used up the cheaper stuff I had (waste not, want not!). But with the difference between the finer thread being so immediately noticeable, now I want to see how the two Italians face off!

Monday, October 11, 2010

Wedding Quilt Appreciation

ZekeonQuilt.jpg

My new son-in-law, Zeke, showing his appreciation for a quilt large enough for his 6'4" height!

The wedding quilt was used at the wedding as the backdrop for a time-release photo "booth" - a special camera snapped a picture every 10 seconds and guests stepped into the booth to strike poses with funny paper eye glasses. However, I neglected to take any photos of the quilt! I'll have to wait for the official photos.

So now for some non-quilt related photos of the wedding! As mother of the bride I get to show off the bride in my blog if I want to!

IMG_5050.jpg

Me and my mom.

IMG_5083.jpg

Bride and groom with my mom, brother, sister, husband, and sister-in-law.

IMG_5126.jpg

Me and the bride!

IMG_5240.jpg

The happy couple.

IMG_5264.jpg

The happy bride.

IMG_5274.jpg

This kiss, this kiss . . .

thatkiss.jpg

Tuesday, September 14, 2010

The Wedding Quilt is Done!

I finally had a sunny day when I was also ready to try to take a picture of the log cabin quilt that I made for my daughter's wedding on October 2nd.

It's not an easy thing to photograph a king size quilt by yourself, let alone on a slightly breezy day! (Wasn't too bad, just blew over once.)

I wish I could have had the whole thing hanging straight but it is mostly.

Tomorrow I ship it off to California to await the wedding. My daughter plans to use it has the backdrop for some of the wedding photos. I'm also using a photo of the quilt on a special chocolate bar that we are making as favors for the wedding

It was a relief to finally finish this huge quilt, but at the same time I'm sorry it is done. I enjoyed handling all that fabric and sewing all of the pieces together.

I'll probably continue working on some more traditional quilts while our workshop season is still in full swing. Then come winter, I'll switch to art quilts. I have some ideas for some larger scale pieces and the workshop studio will come in handy for that.

We had a week off over the Labor Day weekend and flew to Seattle to spend the time with my daughter and future son-in-law. My daughter was a good daughter and immediately gave me the address and directions to several fabric stores and a yarn store!

With a store name like this how could one not shop for yarn with abandon?

These skeins are destine for a "break out" sock. I've been using the same simple sock pattern for years. It's time to try something with a stitch pattern to it! This is why I choose a more solid color yarn.

I bought this yarn with the idea of making a shawl or shrug to go with my mother-of-the-bride dress. But who am I kidding . . . I won't be able to finish something like that in the remaining time!

Then this lovely bunch is going to be turned into washcloths, while I try to convert my knitting style into "picking" instead of "throwing."

I finished another pair of socks on the flights back and forth from NY. Knitting is a great thing to while away the time in coach. Not enough room to do much else!

Then I blew the rest of my fiber shopping budget on fabric.

I'm trying to stock up on dark and light values, as my stash is heavy in the medium values. Sorry, I forgot the name of the quilt shop, but it is just down Market St from Cupcake Royale in Ballard, WA. A nice shop with friendly people. The fabric is contemporary, with a lot of "Amy Butler" types of colors and prints.