Wednesday, April 27, 2011

Falling In Love Again - with Aurifil

It's always wonderful to rediscover a material that you already have in your studio. I'm talking about 12 wt Cotton Aurifil thread.

I've been making Crazy Ties to restock my supply for our inn gift shop (and a special request from one of our art instructors). This particular type of Crazy Tie is quilted and it is always fun to play with specialty threads on these - metallics, holographic, neon, and heavy weight threads.

The quilting can be used to either blend in with the fabrics or to stand out as the main focal point of the tie.

With the 12wt Aurifil thread it TRANSFORMS the fabric! I love the look and the feel of the transformed fabric. Call me crazy, but I love to pet this fabric and feel the texture and heft of the thread.

IMG_0333.jpg


Here is another view where you can really see the difference in the look of the fabric with and without the Aurifil quilting. With the Aurifil, the quilting takes center stage.

IMG_0334.jpg


This is a quilting treatment with regular 50wt Mettler polyester thread. You can see how the fabric remains the focal point instead of the quilting, which is the a supporting player.

IMG_0335.jpg


But now I feel the desire to round out my selection of Aurifil 12 wt! I especially like the variegated colors.

Saturday, March 12, 2011

Missing Quilt

The fear of everyone who has every shipped a treasured item!

My friend, Janet Adkins, just sent this message to me:

My quilt, Kaaterskill, was shipped from Golden, Colorado on February 16, via UPS 2nd Day air. It hasn't been seen since. It was picked up, but never scanned. UPS claims they've looked for the package, but they can't find it. They're willing to issue a claim, but frankly, money won't replace this quilt.

I'm hoping to find someone at UPS or elsewhere who can put some pressure on them to look for the package. I've registered it on the Lost Quilt page, put it up on my Facebook page, and I'm trying to get the Times Union consumer advocate to look into the case.

Everyone I've talked to about it feels the quilt will come back, eventually. But I've already had to withdraw it from one quilt show, and I just found out it's been juried into the AQS show at Paducah - this is it's last chance to enter that show.

If you can help, I would really appreciate it. I can't believe I'll never see this quilt again!


Unknown.jpeg


If anyone has seen this quilt or knows of something that might help find this missing quilt, if would be greatly appreciated.

Thursday, March 03, 2011

Creative Mojo with Mark Lipinski

I've been invited to co-host the internet radio show Creative Mojo with Mark Lipinski on March 9th.

I'm so excited about this because Mark Lipinski is such a "wild" and dynamic person. This is how his website describes him - "international
quilt teacher and quilt fabric designer and creator and former
Executive Editor of Quilter's Home magazine, Mark Lipinski.
Dubbed "the bad boy of quilting" by the international press,
Mark's no holds barred, brutally honest, riotous PG-13 talks
are half quilting and all stand-up comedy."


Creative Mojo airs every Wednesday at 3:00 pm Eastern time and runs LIVE, with listener call-ins, for 2 hours. You can tune in by going to Toginet Radio and click on the listen live button on the right hand side of the page.

However, if you are like me, you might find the podcast easier to find time to listen to (although you won't have the opportunity to call-in to the live show.) You can subscribe to the podcast on iTunes and download all of the past shows to catch up on all the zany fun!

On the show that I'll be co-hosting the guests will be:

Scott Jeffrey, who wrote Creativity Revealed: Discovering the Source of Inspiration. (I've already loaded this one on my Kindle.)


Margaret McCraw, who wrote The Relationship Code. (I'm reading this one now. Interesting theories!)


Mark Montano, an all-around uber crafter, who recently wrote the paper crafting book, Pulp Fiction - Perfect Paper Projects. This looks like it has some great creative idea.


Judi Ketteler, author of Sew Retro, a Stylish History of The Sewing Revolution.


I tell ya, after I got the list of guests for the show and looked up their books on the internet, I wanted to run out and get them all. I'm so looking forward to the discussion on the radio show. Hope you'll listen in!

Tuesday, March 01, 2011

Finished a Sheep Sweater

I just completed my first sweater that used more than one color of yarn. It was certainly a trial managing the different balls of yarn all at once and maintaining an even tension. I was pleasantly surprized with the finished sweater.

IMG_6306.jpg


I like whimsy and this design fit the bill. It is by Fiber Trends and is called Sheep-Go-Round. The yarn I used was Valley Yarn's Goshen, a cotton/modal/silk blend. Very nice to work with.

(I just found out that they also have a really over-the-top design of a sweater with a fuzzy sheep's face making up the entire front of the sweater. I'm tempted but would anyone admit to knowing me if I wore it? LOL!)

989B6F38-447A-4882-AF8B-52C7453642E3.jpg


Monday, February 28, 2011

Mosaics with Fabric Tiles

I've always loved mosaics, probably because they are sort like puzzles and you put them together with lots of tiny pieces. Don't know why I like working with tiny pieces, but I do!

Having finished my first goal of 2011 with the completion of the 5 traditional quilts for our inn guest rooms, I now have some time to get back to some art quilting!

As often happens when you are in that "in-between-projects" state, I'd walk into my studio with my mind spinning with hundreds of ideas, but not sure which one to start with, and would instead immediately consider some sort of procrastination project like cleaning or organizing my studio. Yikes!

So the best thing to do to avoid something as horrid as organizing my studio, is to jump right in with a small project that can be started right away and is quickly finished for that satisfying feeling of getting something done.

I decided to do a mosaic pear.

IMG_6295.jpg


The pieces are about half an inch and are backed with Misty Fuse. I have used Steam-a-Seam II for the mosaics I've previous made, but as I had none handy, I reached for what was handy - the Misty Fuse. It was quite nice to use. After selecting the fabric I was going to use, I cut small sections, about 6" x 6", of each and fused the MF to the backs. I could then cut a batch of fabric tiles from these pieces as needed.

All the tiles are stitched/quilted with varigated rayon thread from Mettler or Sulky.

While finishing it, I was thinking that I'd have to find another image to work with for my next piece, but already I can see different ways of working with the same image - playing with different colors, different angles, different backgrounds.

I created this piece specifically to fit the frame. I have a couple boxes of these frames leftover from when I sold my work at art and craft festivals in California.

Sunday, February 20, 2011

One More for Tradition

I've reached my goal of 5 new traditional quilts for our inn guest rooms! The final one is a Full sized quilt and it is a scrappy Ohio Star pattern.

IMG_6282.jpg


The quilts still need to be quilted but, since I'm not doing that part, I can now get on to other projects! I have a full month before the workshop season begins and I plan to take advantage of every available minute that I can get in my studio.

Saturday, February 19, 2011

The Happy Accident

As I often discover in the midst of working with designs for quilts or art quilts, an accident, mistake, or total disaster can be turned into something that is just as good or even better than what you had in mind in the first place!

When I was creating the design layout for the quilt I posted the other day, I accidently clicked the wrong button in EQ7 (Electric Quilt) and every other row of the blocks shifted one column to the left. After I exclaimed in dismay at my mistake, I took a second look and said "Hmmmmm. Nice." So I saved that design for later before I went back to recreating the first design.

But that wasn't the only oops that resulted in my next quilt. While cutting out the white blocks, I forgot to account for the seam allowance in my measurement, and of course, I didn't think of this until I had already cut out all of the white blocks! So now I had this stack of blocks that were half an inch to short.

So when I returned to my accidental design, I just decreased the height of one of the strips of fabric that made up the colored blocks by half an inch. To then make it appear that this was my intention all along, instead of having purely a gradation of blues in the block, I decided to use at least one blue fabric with some yellow in it and then the smaller strip piece would be a yellow fabric.

IMG_6284.jpg


This is another queen size quilt destined for a bed in one of our inn guest rooms.

Thursday, February 17, 2011

The Beauty of Simplicity

Last year while browsing through some quilt magazine I saw an ad for a book about "modern" quilts. On the cover it featured a quilt with a simple design of stripes composed of gradient colors of blue interspersed with stripes of white. First of all, blue is my favorite color, so that is what caught my eye in the first place, but I was further entranced with the elegant simplicity of the design and the knock-out contrast that the white fabric provided for the blues.

So being the normal red-blooded quilter, I said "wow, I've got to make one of those."

I used EQ7 to create the block (a narrow 12" x 3" block made of of six 2" x 3" pieces of fabric) and then design the layout and size.

The blue blocks were all strip-pieced (2.5" x 40" strips sewn together and then cut into the blocks).

Here is the resulting Queen size quilt.

IMG_6287.jpg


This picture really doesn't it do it justice because of the lighting and the angle, but I'll get a better picture when it is totally quilted and finished.

But I loved the result so much, I immediately continued the process and made a matching Twin size quilt. (We have 5 guest rooms at the Greenville Arms 1889 Inn that have 2 beds - a Queen and a Twin, so this will be a good set for one of these rooms.)

Tuesday, February 15, 2011

Pinwheel King Quilt

It's been a while since I've blogged, but I've been busy doing blog-worthly work so that I'd have something to blog about!

I finished the top for the second King Quilt. It is a scrappy pinwheel pattern. Using white fabrics for contrast really made those bright fabrics "pop."

IMG_6289.jpg


This will go off to be quilted by Eileen Keane on Monday and she'll be bringing back the first King Quilt ready for binding and putting on a guest room bed at our inn, Greenville Arms 1889 Inn.

It has been a snowy winter with some impressive icicles forming on buildings all around town. Here is a shot of the ones outside my studio window.

IMG_0327.jpg


They were quite beautiful when the sun shone through them.

In between quilts, of course, I'm knitting. Here are my latest pair of socks. These are the first lace patterned socks that I've made. They are knit in Summer Sox by Classic Elite - 100% cotton.

IMG_0325.jpg

Saturday, January 15, 2011

More Strip Blocks for a Queen

I finished another quilt top towards my goal of 5 done this winter. I have just one more to go.

IMG_0313.jpg


Sigh, what I wouldn't give for a longarm machine. I currently send all bed quilts out to someone else to do, but would love to be able to do them myself. Not because these other longarmers don't do a great job, just because I'm a do-it-myself kind of person! Well, I can dream.

Today I'll start the final quilt top.

In between, quilting and WORK, I've been knitting, of course. We recently took a trip over to Webs, in Northampton, MA. THE best yarn store I know of. I gave my husband a certificate for a knitted sweater for his birthday, so we had to pick up some yarn for that and I also stocked up on sock yarn - my favorite thing to knit when my brain is too tired to think of anything else.

This is the yarn for the sweater.

IMG_0323.jpg


and a couple of the sock yarns.

IMG_0321.jpg


IMG_0320.jpg

IMG_0317.jpg


All of the yarn came from the extensive discount yarn room/warehouse at Webs. This is the best feature for the budget-minded knitter who still wants top quality yarns.

Sunday, December 19, 2010

Studio Report

The rabbit and squirrel are pinned to my design wall and patiently waiting for their moment to arrive. (Looks like they are watching that field for Spring growth!)

IMG_0300.jpg

My studio it too small to have too many projects active at one time, so they will have to wait until Christmas crafting is finished and then I have to resume work on the 5 bed quilts that are my top priority to finish this winter (3 down, 2 to go).

So a quick look around my studio shows the Christmas minis that I'm working on. I'm sending these instead of paper cards.

IMG_0299.jpg

I debated whether or not to send these as postcards through the mail, but then decided that I'd attach a cord to the tops to turn them into Christmas decorations/ornaments. I figured that by attaching a way to hang them to start with, it wouldn't be left to the recipient to figure out what to do with it or how to hand it up. To attach the metallic cord I inserted tiny grommets in each upper corner and threaded the cord through them.

What's fun about creating these little minis is trying out different threads. For the most part I work with Superior's Bottom Line in the bobbin. On the top I also used their metallic thread, their Highlights thread (loved the punch of that neon color), and their glitter thread (always a favorite way to add the hint of sparkle).

IMG_0310.jpg

My other favorite for the satin stitch around the edges, besides Superior's Highlight, was Mettler's rayon thread - for its smooth, shiny finish. However, I also tried Curicini Tre Stelle's 12 wt cotton thread (see mini below) and was mightily impressed with the wonderful dense, smooth coverage it produced. Very nice and no problems with tension adjustment. (I use a lot of metallics and heavy weight threads when quilting, so I always automatically reduce the upper tension on my Bernina to around 1 or 2 and use a 90/14 needle.)

IMG_0304.jpg

Unfortunately, I didn't have any 12 wt Aurifil on hand in colors that would work for the minis, so can't compare it for the satin stitch, but I have always liked it when I want a highly visible quilting stitch and so used it on several of the minis for that purpose.

The rest of my studio is still a mess with all of the hat boxes and hats that I haven't had time to deal with and with various parts of the bed quilts in process, not to mention the pile of yarn balls that were the result of my undoing a knitted coat I had made. (The two you see are just some of the 10+ that are piled on the floor.)

IMG_0301.jpg

So that you have it, the current state of my studio.

Wednesday, December 15, 2010

More Animals Assembled

Ok, so that's not a scintillating post title. All of my creativity must drained into the squirrels.

The next animal I create during the Hudson River Valley Art Workshops retreat is a squirrel. Technically a Gray Squirrel, but all of the Gray Squirrels around here are two-tone. It's fun watching them outside of my office window. Occasionally I'll see one outside the window of my third floor studio. They are always shocked to see a human that far above the ground! LOL.

IMG_0285.jpg

IMG_0286.jpg

It is a fun process to create animal figures. The tricky part is getting the right expression and maintaining the animal-ness while using commercial prints. I like the commercial prints for the little "surprizes" you see - like the flowers on the belly of the squirrel.

The next step will be to come up with a scene to put these critters in.

Thursday, December 09, 2010

Fused Animal Figures

I'm getting a little break from my regular duties as innkeeper and art workshop director, to join in the fun in the studio during our December retreat. I am giving some informal lessons on how I create the rabbits for my rabbit series. I use two different techniques and was going to show both, but everyone is having such fun with the fused method (which is faster. LOL) that we have gone from rabbits to squirrels!

These are two of the finished rabbits. The one on the right is mine and the one on the left is by Leonie Lister of Australia.

IMG_0275.jpg

I'm supplying the fabric, so Leonie and I are working on tables opposite of each other and selecting from the same stash, but you can see what a difference it makes with how the values are used and where they are placed on the figure.

These rabbits will eventually be put in a composition with other similarly made elements, but because Leonie, just loves squirrels, we all decided to jump to that.

This is the start of my squirrel - the freezer paper templates.

IMG_0278.jpg

If I had made the squirrel the same scale as the rabbit, I could have put them in the same composition, but I decided to go for the mondo-sized squirrel. Watch out for your nuts!

Wednesday, December 01, 2010

Is Lint Really the Issue

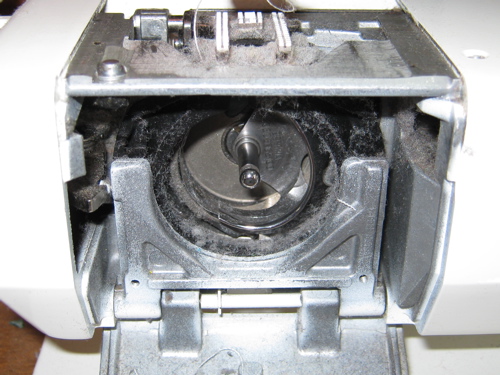
I finished using all five bobbins worth of Aurifil 50 wt thread and took the standard shots of the bobbin case and throat plate area.

IMG_0255.jpg

IMG_0256.jpg

Yeah, there was lint. Pretty much similar to the lint build up seen with the Curicini Tre Stelle thread. So I have decided that I better do another test with less expensive brand of thread I had been using, to see if there was really going to be that much difference.

So here is a pic after one bobbin of use.

IMG_0258.jpg

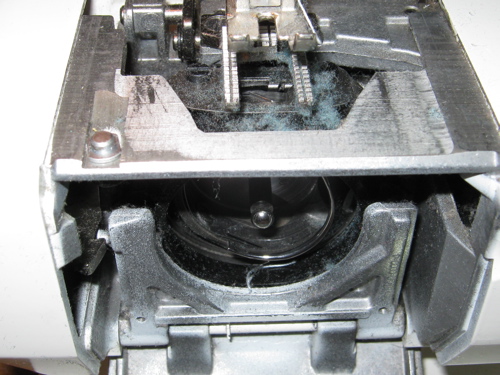
Hmmm. Not a whole lot of difference between this and the Italian threads.

But then I was thinking . . . is lint really that big of deal or is it just the red herring of thread attributes? I mean so what if there is some lint -- after all what do you expect with cotton? Is the presence of lint going to make that much difference in the quality of the stitch or use of the machine? Yes, you do have to clean the lint out of the machine for the best continued performance, but that's just a part of maintenance.

So let's forget about the lint! Let's focus instead on the more important qualities of the thread - the appearance of the stitch, the way it is handled by the machine, and range of colors!

I thought that the Italians were pretty close in this comparison. The stitches were beautiful and the thread ran smoothly through the machine. I'll give the slight nod to Aurifil, though, on the stitch appearance -- the thread really did seem to just melt and become one with the fabric.

However, the difference between the Italians and the cheaper thread was quite marked. I could feel the ridge of the cheaper thread stitches on the surface of the fabric and the louder noise of the machine running with the cheaper thread was definitely noticeable. With the Italians, the machine just purred.

The end result -- I'm giving up using the cheaper thread! Yes, I am definitely on a limited budget but since I'm not using up billions of yards of thread per year, I feel that a thread that can make my sewing machine purr is worth it!

Both of the Italian thread companies offer an array of thread weights and materials, which I'll be comparing as I come to a project that can use them. I'm especially interested in trying the heavy weight cotton threads, as well as the wool and silk threads because those are the threads that a meant to be seen on the surface of the work.

So here's a toast to the Italians! They are as smooth and sweet as a Sauterne!

IMG_5602.jpg

I'm still working on piecing quilt tops, so if I notice any other aspect of note about these threads, I'll be sure to mention it.

The next top is a Queen size and it will use a simple 3.5" x 12" block design that will appear as stripes of blues alternating with white. These are my blues.

IMG_0260.jpg

Tuesday, November 16, 2010

Aurifil Test Begins

Yesterday I started the comparison test with Aurifil. Just like for Curicini Tre Stelle, I wound 5 bobbins and cleaned and oiled the bobbin case.

IMG_0240.jpg

IMG_0241.jpg

Here is the pics after completing one bobbin full.

IMG_0242.jpg

The throat plate lint build up looks similar to the results for the Tre Stelle, but the bobbin case looks less linty.

IMG_0243.jpg

As expected, this thread handles like a dream. Smooth, quiet, and stitches that practically melt into the fabric.

I'm still only on the second bobbin, but completed the blocks for the scrappy pinwheel quilt top. I had to take the blocks out to the carriage house studio to use the floor space as my design area. First I set up the blocks on the tables in stacks of like colors - my design palette!

IMG_0245.jpg

Next I lay out the blocks, being careful to keep a pleasing mix of colors in all the rows.

IMG_0250.jpg

I had to stand on a ladder and hold the camera above my head to try to get as much of this quilt top in my photo frame as possible. And if you think that was a funny sight, imagine me picking up all of these blocks and keeping them in order as I stacked them from left to right!

IMG_0251.jpg

IMG_0253.jpg

Curicini Tre Stelle Prelim Results

I finally used up 5 bobbins of Curicini Tre Stelle 50 wt thread. I say "finally" because it seemed to last forever. This fine 2 ply thread allowed me load up the bobbins with more length than I could get with my previous brand of thread. Nice!

Here are pics of under the throat plate and in the bobbin case after the 5th bobbin was emptied.

IMG_0235.jpg

IMG_0236.jpg

So there is a bit of lint build up, but is this from the thread or the fabric? To early to tell (unless someone more familiar with lint patterns can enlighten me!) In addition to now testing Aurifil, I'll also do a similar 5 bobbin test with my previous much cheaper thread to see how that compares with these two fine Italians.

But I must say that even with a little lint build up, this thread was beautiful to use. It ran smoothly and quietly through my Bernina and lay down nice low profile stitches. Already, no matter who comes out on top, I'm sold on these quality threads.

I'm on to my second king-size scrappy quilt. This time I'm using 2 triangles to create a 4" square, and then arrange these into a pinwheel block. I'm loving how many squares I can assemble with this thread before emptying a bobbin.

IMG_0239.jpg

Monday, October 25, 2010

The Italian Face Off - Aurifil vs Curicini Tre Stelle

And so it begins . . .

I was so intrigued by my first experience with fine Italian threads that I've decided to do a head to head comparison between Aurifil and Curicini Tre Stelle.

I first learned of Aurifil at the Houston Quilt Festival back in 2005 and immediately fell in love with their 12 wt variegated thread. I like to use variegated thread for quilting and the 12 wt was a nice hefty thread that was still thin enough to run through my Bernina.

The Curicini Tre Stelle thread is new to me, but is a from a company that has been around for decades.

The first round of the Italian thread faceoff will be between 50 wt threads doing regular piecing. I use a Bernina 1260 and a 90/14 needle (because I don't like changing needles between cotton and metallic threads!)

In this corner is a grey 2-ply 50 wt Curicini Tre Stelle thread.

IMG_0223.jpg

I've filled 5 bobbins and cleaned the bobbin case.

IMG_0224.jpg

Then in this corner, anxiously waiting his turn, is a white 2-ply 50 wt Aurifil thread.

IMG_0226.jpg

I am piecing regular commercial 100% cotton squares with a straight stitch and will go through 5 full bobbins. I'll be counting thread breaks and checking lint build up after each bobbin finishes.

IMG_0231.jpg

So far, I completed 1 bobbin full of the Curicini Tre Stelle. This is what the bobbin case looked like afterwards.

IMG_0229.jpg

IMG_0230.jpg

Sort of linty! Could be from the fabric, could be the thread, but won't know until the full test is finished. I'm thinking I may have to also run this test with the cheap brand of thread I was previously using just to get a data point on linty-ness.

Other than the lint, the Curicini is running smooth and beautiful through my machine and creating lovely stitches.

I have finished off one simple quilt top, but the challenge will continue on the next! Stay tuned for scintillating photos of lint build up or lack there of.

IMG_0233.jpg

(Sorry, no wet t-shirts or tight Italian pants in this faceoff. I'll have to leave those images to your imagination!)